Gems & Shards
Updated September 17, 2026
Gems
A gem is a project workspace in crystl. Each gem is tied to a directory on your machine and appears as a tile in the crystal rail (the draggable glass bar at the edge of your screen) and as a tab in the gem sidebar down the left side of the terminal window.
Gems give you:
- Project isolation: Each gem has its own set of terminal sessions, its own approval mode, and its own
.crystl/project.jsonconfig (name, icon, color) - Quick switching: Click any gem in the crystal rail or the gem sidebar to jump between projects
- Per-gem identity: Pick an icon and color per gem so you can tell them apart at a glance
Creating a gem
Choose the flow that matches what you are opening:
| Control | What happens |
|---|---|
| + new, bottom of the gem sidebar | Creates an unconfigured gem in your home directory. Click the pulsing folder icon in the status bar to open an existing project folder. |
| +, bottom of the crystal rail | Opens the New Gem panel to create a new project: name, path, icon, color, MCP servers, agent files, then Create. |
“+ new” never asks for a directory immediately. The gem is created at ~ and marked unconfigured, and a folder icon appears in the status bar at the bottom of the window, next to the path. It pulses until you engage with it. Click it to open the directory picker and re-root the gem on your project.
In the New Gem panel, path is the parent directory, not the project folder. It defaults to ~/Projects, so a gem named my-app lands at ~/Projects/my-app. There’s no folder browser there because the panel creates a new directory rather than picking one. The default parent lives in settings, general > gems, under DEFAULT GEMS DIRECTORY.
Initialize git repository is off by default. Turn it on when this new folder should become its own repository; the remote URL field then appears and is prefilled from settings, general > gems, under GIT REMOTE BASE URL when you have configured one. Leave it off when the folder should remain part of an existing parent repository or does not need Git.
The directory picker
The picker that opens from the status-bar folder icon starts where your projects already live. It uses your default gems directory when that folder exists, and otherwise looks for the first of ~/Projects, ~/Developer, ~/dev, ~/code, ~/src, ~/repos, ~/work that’s actually there, falling back to your home folder. It only detects, it never creates a folder for you.
Each open option does something different: open here takes the folder you’re browsing, open selected takes the highlighted folder, and go up navigates to the parent when the parent row is selected.
When the folder sits inside a bigger repo
If you create a gem in a folder that lives inside a larger git repository, crystl says so up front instead of letting you find out later. Shared shards work normally there, but isolated shards need the gem to be its own repo. You get two choices:
- use shared shards: The default. Creates the gem without adding a nested repository. Its shards share the parent repository and isolated shards remain unavailable for this gem.
- make standalone repo: Creates the gem with its own Git history, separate from the parent repository, so it can back isolated shards.
It’s a warning, not a refusal. Either answer creates the gem; choose the standalone repository only when separate Git history is intentional.
All three of these open a different project. To spawn another terminal in the same project, use the shard bar (see below).
Shards
A shard is a terminal session within a gem. Think of shards as tabs inside a project: each one runs its own shell process and can have its own Claude Code session. Shards appear in the shard bar across the top of the terminal.
Shards are named after crystals: diamond, opal, jade, lapis, topaz, pearl, amber, quartz, ruby, garnet, emerald, cobalt, peridot, zircon, amethyst, tanzanite, carnelian, turquoise, morganite, with an extended roster (sapphire, aquamarine, citrine, and more) that takes the list to forty names for busy gems. Each crystal has a signature color used for the shard label text and underline accent in the shard bar. The first shard in every gem is always diamond.
A shard’s crystal name is set when it’s created: in the app, new shards are auto-assigned the next free crystal, with a numeric suffix (amber-2) when the plain name is taken, which is what an isolated shard gets whenever a leftover branch still holds the plain name; and from the CLI you can pick any name you want by passing --crystal-name (see below); the flag isn’t limited to the crystal list, so crystl shard create --gem myapp --crystal-name deploy-bot works and names the shard deploy-bot. The built-in crystals are just the defaults, and the names that carry a signature color in the shard bar.
Separately from the crystal name, every shard carries a stable internal ID plus an editable display label. crystl shard rename --gem myapp --shard opal --name "auth-refactor" sets a short label (lowercased, ≤14 characters) shown on the shard’s pill, in the window title, and in crystl shards / crystl status, without touching the crystal name, git branch, or session identity, so restore, history, and formations all survive a rename. After renaming you can address the shard by its label, its crystal name, or its ID; ambiguous duplicate labels are rejected rather than silently routing to the wrong shard. See shard rename for details. Creating and renaming shards from the CLI are Guild actions; on the free tier you create shards with the in-app + button, which auto-assigns the next crystal.
Shard-tab badges
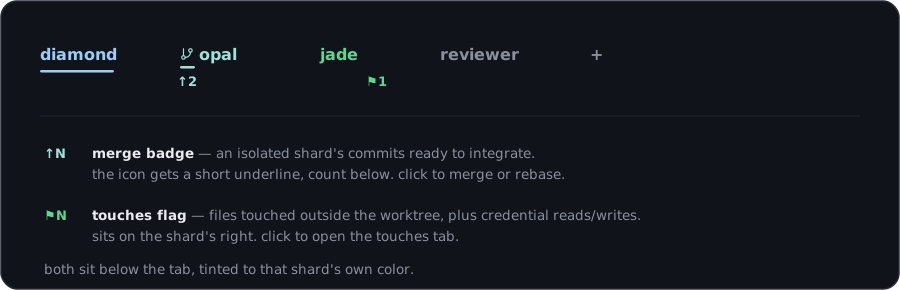
Two small badges can sit below a shard’s tab, both tinted to that shard’s own color so you can tell at a glance which shard they belong to:
- ↑N — merge badge. An isolated shard with unmerged commits shows the number of commits ready to integrate. Click it to open the merge and rebase actions. See Merging back to main.
- ⚑N — touches flag. The count of that shard’s unreviewed surfaced file touches — writes outside its worktree, credential reads and writes, and the like. Click it to open the agent activity panel on the touches tab and see exactly what it did.
Creating a shard
Click the + button on the shard bar to add a new shard to the current gem. The new shard starts at the gem’s directory (see below). If the current shard is SSH’d into a remote host, the new shard automatically reconnects to the same host and cds to the same remote directory; see remote SSH for why remote shards follow your location.
The creation column
The + is the only creation control sitting in the bar. Hover it and a small glass column drops down beneath it with the rest:
| Row | What it does |
|---|---|
| ⎇ new isolated shard | A shard in its own git worktree and branch. See Isolated shards |
| ⚔ summon a hero | A specialist shard from the hero catalog. See hero shards |
| ◫ split pane | Splits the gem into two panes; reads close split and stays lit while you’re split |
The column stays open while your pointer is inside it, so you can move diagonally from the + down to a row without it closing. Move away and it fades.
The column replaces the older behavior, where these three icons slid out sideways from the +. Dropping them downward means the bar no longer reserves horizontal space for icons that are invisible at rest, so your shard pills get that width back. If you’ve seen a screenshot or a walkthrough showing icons appearing to the right of the +, that’s the old layout.
The summon a hero row appears only when quest is enabled in Settings.
Where shards start
Every local shard starts at its gem’s directory. That’s by design: the gem is the anchor, so a new shard always begins at the project root no matter what any other shard is doing. (Remote SSH shards are the one exception; they follow your remote location because reconnecting and re-navigating over SSH is expensive.) cd around all you like in one shard; it never changes where the next shard starts, and it never changes the gem itself.
Want the new shard to start where you are instead? Right-click (or control-click) the + button. The new shard opens in the directory the current shard is cd’d into. Right-clicking the isolated-shard row in the column does something different: it opens the deliberate create panel, where you can name the shard (which also names its crystl/<name> branch) and fork it from a chosen base branch.
If you start an agent in a sub-project (a git repo below the gem root), crystl offers to open that folder as its own gem. It’s a dismissible suggestion, never automatic. Accept it and the sub-project gets its own shards, approval mode, and config; dismiss it and nothing changes.
From the CLI
Once you’ve installed the crystl CLI, you can spawn shards from any shell. Handy for scripts and for orchestrator agents that want to fan work out into sibling shards.
crystl shard create --gem myapp                          # shared cwd
crystl shard create --gem myapp --isolated               # git worktree
crystl shard create --gem myapp --crystal-name opal      # pick the name
crystl shard create --gem myapp --prompt "add tests"     # launch an agent on a task
crystl shard create --gem myapp --hero seeker --prompt "review auth" # named hero on a task
crystl gauntlet "release readiness"                      # spawn a review crew
The same --gem <name> flag accepts the gem’s display name or its UUID. List options with crystl shards --gem myapp. For broader readiness passes, crystl gauntlet creates a named crew of isolated shards (gauntlet-seeker-a, gauntlet-seeker-b, gauntlet-monk, and gauntlet-scribe) so the reviewers are easy to track in the shard bar.
Isolated shards
For multi-agent workflows, hover the + on the shard bar and click new isolated shard in the column that drops beneath it. That creates an isolated shard backed by a git worktree. Each isolated shard gets its own branch (crystl/{name}), so multiple Claude agents can work on the same repo without stepping on each other.
- Local gems: The worktree is created at
.crystl/worktrees/{name}inside the project directory. - SSH gems: If the current gem has an active SSH session, the worktree is created on the remote server instead of locally. This lets you run isolated agents directly on the host where the code lives.
Isolated shards are marked with a ⎇ prefix in the shard bar. See isolated sessions for the full rundown, including the merge-on-close prompt and agent guardrails.
Working with shards
- Session state: Each shard maintains its own shell history, working directory, and Claude session. Claude sessions autosave and restore when you restart crystl, so you pick up right where you left off. (Approval mode is set per gem; an isolated shard’s worktree carries its own
.crystl/project.json, so it can hold its own mode too.) - Claude awareness: When you run
claudein a shard, crystl automatically connects to manage approvals through its glass UI - Context load indicator: After a shard has had 3+ Claude turns, a ~N turns left label appears in the status bar estimating how much of the context window is still available. Click it to open the context load panel, which shows per-turn token history and your current burn rate so you can decide when to
/clearor compact. - Undo close: Closed a shard by accident? crystl keeps a short undo-close list per gem; bring it back with
crystl resurrect, name, color, isolation, and agent session intact.
The gem menu
Click the ⋮ on a gem’s tab to open its menu. The same menu is available from the gem’s crystal rail tile. It contains:
- history: Browse and reopen past sessions for the gem (see conversation history).
- settings: Open the three-tab Gem Settings panel described below.
- optimize: Analyze the gem’s agent files, plugins, skills, and context load, then open the optimizer.
- resurrect ›: Reopen a recently closed shard in this gem. The row is dimmed when there is nothing to restore.
- auto-approval ›: Set the per-gem mode to Default, off, in gem, or all without opening the full settings panel (see approval modes).
Clicking the body of a gem’s tile still focuses the gem; clicking it again pops a compact roster of that gem’s shards and their status (the full agent activity panel is the rail’s diamond icon). Use the tile’s menu control for the menu above.
Gem settings
Open the gem menu and choose settings. These settings apply to the gem and the shards created inside it; they do not change unrelated gems.
general
- AUTO-APPROVAL (CLAUDE / CODEX): Override the global mode with Default (Global), off, in gem, or all. The gem menu’s auto-approval › shortcut changes the same value.
- Spawn agent: Set the agent and optional model used when crystl launches an agent for this gem. It inherits the global default until overridden and appears for Guild members.
- Initialize git: Shown only when the gem is not already a Git repository. It creates a repository and initial commit so the gem can use isolated shards.
- Name, color, and icon: Change the gem’s display identity. The directory path is fixed after the gem is opened and is not editable here.
agents
- Agent files: edit opens the block editor for the gem’s agent instruction files; optimize analyzes them and the rest of the gem’s context. Existing root agent files are listed read-only in this panel.
- Claude plugins: Enable or disable installed Claude Code plugins for this gem.
- Claude skills: Enable or disable user-level Claude skills for this gem.
- MCP servers: Choose which servers from the global MCP catalog are enabled in the gem’s
.mcp.json. - Codex plugins and skills: These are global rather than per-gem, so the panel links to the Codex settings page instead of presenting per-gem toggles.
worktrees
- Integration target: Choose the repository default branch, the branch checked out when a shard starts, or a specific branch as the base and merge target for isolated shards.
- New branch per sealed quest: Give each sealed quest a fresh integration branch.
- Reset to global defaults: Remove the gem override and inherit the global worktrees setting again.
The history, optimize, and resurrect entries are actions in the gem menu, not Gem Settings values. Global session-history and Facet Inserts preferences remain in app Settings.
Plugin and skill inclusion
The New Gem panel and Gem Settings panel include collapsible sections that control which Claude plugins and skills load into agents started inside this gem. Each section shows a checkbox row per installed entry; unchecking an entry writes a disable flag on save.
- ENABLE CLAUDE PLUGINS: every installed Claude Code plugin from
~/.claude/plugins/. Unchecked entries writeenabledPlugins.<id>: falseto<gem>/.claude/settings.jsonso that plugin doesn’t load when you run Claude inside this gem. - ENABLE CLAUDE SKILLS: same pattern for user-level Claude skills from
~/.claude/skills/. Unchecked entries land in the same<gem>/.claude/settings.jsonunderskillOverrides.
Codex plugins and skills currently have global scope. Manage them from settings, agents > codex; restart a running Codex session after changing them.
These same lists power the per-row disable menus in the context load panel. Use the panel for ad-hoc, one-row-at-a-time changes during a live session and use Gem Settings to lock in the per-gem default before you start work.
The shard menu
Hover a shard pill and click its ⋮, or right-click the pill, to open the menu for that individual shard. crystl does not currently have a separate Shard Settings panel; this menu contains the shard-scoped controls and information:
- rename: Set or clear the shard’s display label without changing its crystal name, branch, or internal identity. This row is hidden for quest party members and shards participating in an active side quest.
- details: Show the crystal name, custom label, detected agent and model, and the branch when the shard is isolated. Hero and quest shards show their richer hero details instead.
- turns: Select the shard and open its context-load panel with per-turn token usage and estimated capacity.
- merge … and rebase …: Shown only for isolated shards. The labels name the shard branch and the gem’s configured integration target.
- close shard: Close this shard. It is disabled when it is the gem’s only shard. Closing an isolated shard with work follows the normal merge, keep, or discard safety flow.
The shard menu does not configure color, approval mode, agent defaults, MCP servers, plugins, or skills. Normal in-app shards inherit those from their crystal identity, their gem, or global Settings as described above. A programmatic integration can supply a temporary session-level approval override, but it is not a setting in the shard ⋮ menu.
Auto-detect on new gem
When you create a new gem, crystl scans the chosen project directory for marker files and, if it finds any, pops an alert proposing which Claude plugins to enable for the new gem. Markers it looks for:
| Marker | Suggests |
|---|---|
vercel.json or next.config.* |
Vercel / Next.js plugins |
shopify.app.toml |
Shopify plugin |
wrangler.toml or wrangler.jsonc |
Cloudflare plugin |
supabase/config.toml |
Supabase plugin |
.sentryclirc or sentry.properties |
Sentry plugin |
Package.swift |
Swift tooling |
The alert lists the suggested set and gives you three buttons:
- accept: unchecks every non-suggested plugin in the New Gem panel before the gem is created, leaving only the matches enabled
- customize: closes the alert without changing checkbox state so you can tweak the inclusion lists yourself before hitting Create
- skip: leaves all plugins as-is (default: every installed plugin enabled)
The dialog only fires on new-gem creation, not on existing gems being reopened.
the crystal rail
The crystal rail is the glass bar that sits at the edge of your screen: left, right, or top. Drag it to any edge to reposition, or set it in Settings. It shows all your gems and lets you:
- Switch between projects with a click
- See which gems have active Claude sessions
- Create new gems and shards
- Pop a gem’s compact shard roster with a second click, or open the full agent activity panel from the diamond icon